Battery switch on travel trailer function is crucial for managing your RV’s power. Understanding how these switches work – whether rotary, push-button, or electronic – is key to preventing battery drain and maximizing your off-grid adventures. This guide breaks down the different types, their pros and cons, troubleshooting tips, and safety best practices to keep your travel trailer’s electrical system humming smoothly.
We’ll explore how battery switches interact with other systems like inverters and solar panels, ensuring you’re equipped to handle any electrical situation. From understanding the basic function to tackling more complex integration issues, this guide provides a comprehensive look at maximizing your travel trailer’s power.
Types of Battery Switches in Travel Trailers
Choosing the right battery switch for your travel trailer is crucial for managing power and protecting your batteries. Different switches offer varying levels of convenience, complexity, and protection. Understanding the pros and cons of each type will help you make an informed decision.
Rotary Battery Switches
Rotary switches are a classic and widely used option in travel trailers. They typically feature a rotating dial that allows you to select different battery configurations (e.g., battery 1, battery 2, both batteries, or off). These switches are generally simple to understand and use, making them a popular choice for many RVers.Advantages of rotary switches include their straightforward operation, relatively low cost, and ease of installation.
Disadvantages include the potential for wear and tear on the switch mechanism over time, and the fact that they don’t offer the sophisticated features found in more modern switch types. They also usually only allow for a limited number of battery configurations.
So, you’re an audiophile who loves to travel? Awesome! First things first, check out this guide on setting up your audiophile travel setup – it’s crucial for those perfect tunes on the go. And while you’re planning, don’t forget travel insurance! Getting Aon travel insurance is a smart move; you never know what might happen, and peace of mind is priceless, especially when you’ve got expensive audio gear with you.
Push-Button Battery Switches
Push-button switches offer a more modern and sometimes more compact alternative to rotary switches. They typically use push buttons to select different battery configurations. Some models may include LED indicators to show the current status of the battery connections.While generally reliable, push-button switches can be slightly more expensive than rotary switches. Installation is usually straightforward, similar to rotary switches.
The main disadvantage is the potential for accidental button presses, which could lead to unwanted battery configurations.
Electronic Battery Switches
Electronic battery switches offer the most advanced features and control. They often include remote control capabilities, allowing you to switch battery configurations from inside your travel trailer or even remotely using a smartphone app (depending on the model). These switches often include features like battery monitoring, low-voltage protection, and sophisticated charging control.The primary advantages of electronic switches are their advanced features and convenience.
However, they are typically the most expensive option and can be more complex to install, often requiring more wiring and potentially specialized knowledge. Maintenance might also involve software updates or more specialized troubleshooting.
Comparison Table
| Feature | Rotary Switch | Push-Button Switch | Electronic Switch |
|---|---|---|---|
| Cost | Low | Medium | High |
| Installation Complexity | Low | Low to Medium | Medium to High |
| Operation | Simple, Rotating Dial | Simple, Push Buttons | Advanced, Often Remote Control |
| Features | Basic On/Off, Limited Configurations | Basic On/Off, Some with LED Indicators | Advanced Features, Battery Monitoring, Remote Control |
| Maintenance | Minimal | Minimal | Potentially more complex, software updates |
Function and Purpose of Battery Switches
A battery switch is a crucial component in a travel trailer’s electrical system, acting as the central control for power distribution and battery management. It allows you to isolate and manage power flow between your house battery (powering interior lights, appliances, etc.), your vehicle’s starting battery (for engine operation), and external power sources like shore power or a generator.
This control prevents unwanted drain and allows for safe and efficient power usage.Battery switches primarily serve to prevent parasitic drain on your house battery. Parasitic drain refers to the slow, constant discharge of your battery even when your trailer is not in use. This drain can be caused by small appliances drawing power even when turned off, or by faulty wiring.
A properly used battery switch isolates the house battery when not connected to shore power or a generator, preventing this slow drain and ensuring your battery retains its charge.
Battery Switch Power Management
A battery switch effectively manages power from various sources. When connected to shore power at a campsite, the switch directs power to charge the house battery and power the trailer’s appliances. This prevents the house battery from discharging while simultaneously providing power to the trailer. Similarly, when running a generator, the switch routes the generator’s power to both charge the battery and supply the trailer’s electrical needs.
Solar panels can also be integrated into this system; the switch will allow the solar power to charge the house battery, further extending your off-grid capabilities.
Battery Switch Operation
A typical battery switch operates using a simple on/off mechanism, often with multiple positions. Let’s consider a three-position switch as an example:
1. OFF
In this position, both the house battery and the starting battery are completely isolated. No power flows to or from either battery. This is the recommended position when storing your travel trailer for extended periods.
2. BATTERY
This position connects only the house battery to the trailer’s electrical system. Shore power or generator power will charge the house battery. The starting battery remains completely disconnected.
3. BOTH
This position connects both the house battery and the starting battery to the trailer’s electrical system. This is usually only used briefly when starting the vehicle and the house battery needs a boost from the starting battery or when both batteries need to be charged simultaneously from an external source.Properly using the battery switch is key to extending the lifespan of your batteries and avoiding unexpected power failures while camping.
Always remember to turn the switch to the “OFF” position when storing your trailer for extended periods to prevent parasitic drain.
Troubleshooting Common Battery Switch Issues: Battery Switch On Travel Trailer Function
Dealing with a non-functioning battery switch in your travel trailer can be frustrating, but systematic troubleshooting can often pinpoint the problem quickly. Understanding the common causes and employing a logical approach will save you time and potential frustration. This section will guide you through identifying and resolving typical battery switch malfunctions.Troubleshooting a non-functioning battery switch usually involves checking several key areas.
A methodical approach is crucial to avoid unnecessary work. Remember to always disconnect the battery before starting any electrical work for safety.
Common Battery Switch Problems
Several issues can cause your battery switch to fail. These include a faulty switch itself, corroded connections, blown fuses, or even a problem with the wiring. Identifying the specific problem is the first step to a successful repair.
Diagnosing a Non-functioning Battery Switch
The first step is to visually inspect the switch and its connections. Look for any obvious signs of damage, such as cracks in the switch housing or loose wires. Pay close attention to the terminals; corrosion is a common culprit, appearing as a greenish or whitish buildup. Clean any corrosion using a wire brush and baking soda paste.
After cleaning, inspect the fuses associated with the battery switch. A blown fuse will show a broken filament. Replace any blown fuses with fuses of the correct amperage rating. If the problem persists after these checks, the switch itself may be faulty and require replacement.
Troubleshooting Flowchart
A flowchart can help visualize the troubleshooting process. Imagine a diagram starting with “Battery Switch Not Working?”. The first branch would be “Visually Inspect Switch and Connections”. If corrosion is found, the branch would lead to “Clean Connections”. If no corrosion is found, the next branch would be “Check Fuses”.
If a blown fuse is found, the branch would lead to “Replace Fuse”. If no blown fuse is found, and the problem persists, the final branch would be “Replace Battery Switch”. Each “yes” or “no” answer would lead to a new step until the problem is resolved.
Replacing a Faulty Battery Switch
Replacing a battery switch involves disconnecting the battery, removing the old switch, and installing the new one. First, disconnect the negative battery cable. Then, carefully disconnect the wires from the old switch, noting which wire goes to which terminal. Unscrew the switch from its mounting location. Install the new switch, ensuring it’s securely mounted.
Reconnect the wires, matching them to their original terminals. Finally, reconnect the negative battery cable and test the switch. Remember to always consult your travel trailer’s wiring diagram for specific instructions and wire colors. Incorrect wiring can lead to electrical damage or even fire.
Safety Considerations and Best Practices
Working with batteries, especially in a confined space like a travel trailer, requires caution. Improper handling can lead to serious injury from electrical shock, burns, or explosions due to hydrogen gas buildup. Understanding and following safety procedures is paramount to protecting yourself and your equipment. This section details crucial safety measures and best practices for working with your travel trailer’s battery switch and battery system.Proper grounding and wiring are essential for safe battery operation and to prevent electrical hazards.
A properly grounded system ensures that stray electrical currents are safely diverted to the earth, preventing shocks and protecting sensitive electronic components within your trailer. Incorrect wiring can lead to short circuits, overheating, and potential fires. Always use appropriately sized wires and connectors for the amperage your system requires. Consult a qualified electrician if you’re unsure about any aspect of your wiring.
Battery Handling Safety
Working with 12-volt batteries is generally safe, but precautions are still necessary. Always wear safety glasses to protect your eyes from potential splashes of battery acid. Acid burns are extremely painful and require immediate medical attention. Never allow the acid to come into contact with your skin or clothing. If contact does occur, immediately flush the affected area with plenty of water for at least 15 minutes and seek medical attention.
Ensure adequate ventilation when working near batteries as they produce hydrogen gas, which is highly flammable and explosive. Avoid sparks or open flames near the batteries. Before working on any part of the battery system, disconnect the negative (-) terminal first to prevent accidental short circuits.
- Always wear safety glasses.
- Wear gloves to protect your hands from acid.
- Work in a well-ventilated area.
- Disconnect the negative (-) terminal first before working on the system.
- Never allow sparks or open flames near the batteries.
- Use caution when handling battery acid. Flush with water immediately if contact occurs and seek medical attention.
Proper Grounding and Wiring, Battery switch on travel trailer function
A solid grounding system is crucial for electrical safety. The chassis of your travel trailer should be properly grounded, usually through a connection to the vehicle’s frame. All wiring should be appropriately sized for the current it will carry, using the correct gauge wire and connectors. Loose or corroded connections can lead to overheating and potential fires.
Regularly inspect all wiring and connections for signs of damage or corrosion. Replace any damaged or corroded parts immediately. Use appropriately sized fuses or circuit breakers to protect the wiring and prevent overload.
Battery Switch Maintenance
Regular maintenance extends the lifespan of your battery switch and ensures its safe and reliable operation. Periodically inspect the switch for signs of corrosion, loose connections, or damage. Clean the terminals and connections with a wire brush and apply a corrosion inhibitor to prevent future corrosion. Lubricate the switch mechanism as needed according to the manufacturer’s instructions.
If you notice any signs of malfunction, replace the switch immediately rather than attempting repairs. A faulty switch can lead to electrical problems and potential safety hazards.
- Inspect the switch regularly for corrosion or damage.
- Clean terminals and connections with a wire brush.
- Apply a corrosion inhibitor to terminals.
- Lubricate the switch mechanism as needed.
- Replace a malfunctioning switch immediately.
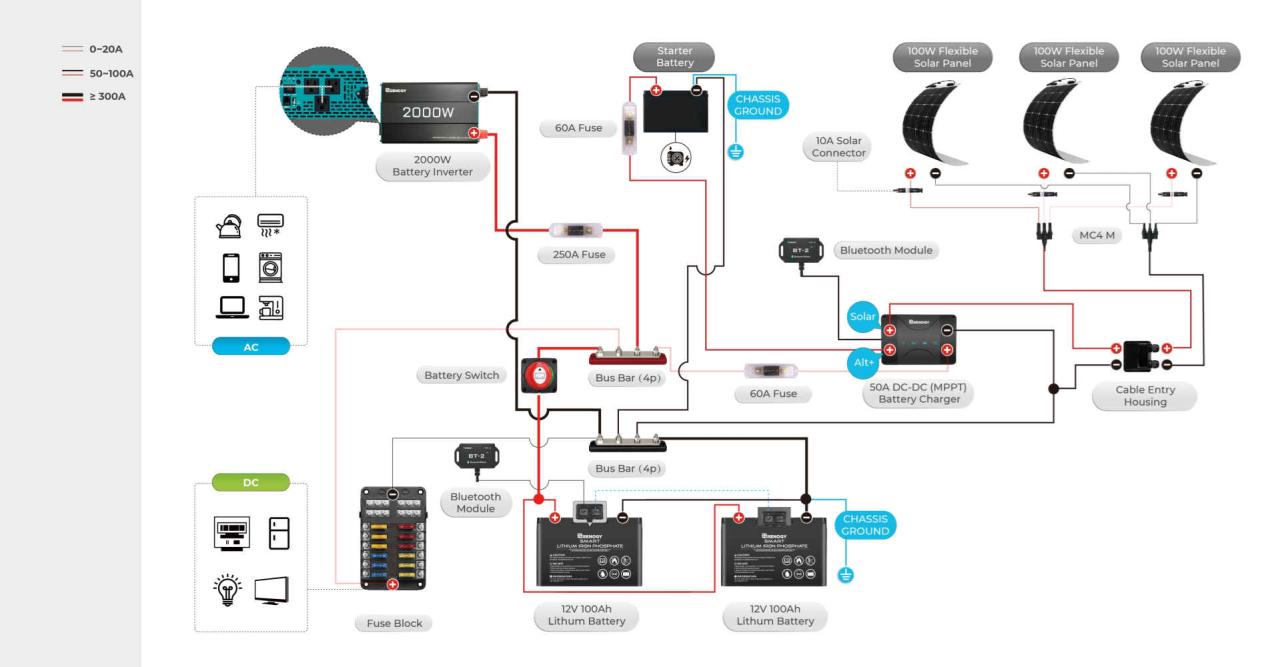
Battery Switch Integration with Other Systems

Your battery switch isn’t a standalone component; it’s the central nervous system of your travel trailer’s DC power. Understanding how it interacts with other systems like your inverter, converter, and solar charge controller is crucial for efficient and safe power management. A properly integrated system ensures smooth power flow and prevents potential damage.A faulty battery switch can significantly impact other electrical systems.
It’s the gatekeeper, controlling power to everything downstream. A malfunction can lead to power outages, improper charging, and even damage to sensitive electronics. Therefore, understanding the implications of a faulty switch and knowing how to troubleshoot it is paramount.
Inverter Integration
Integrating a battery switch with an inverter is straightforward. The inverter typically draws power directly from your house batteries. The battery switch acts as the on/off switch for this power supply. Proper wiring involves connecting the output terminals of the battery switch to the DC input terminals of the inverter. This ensures the inverter only receives power when the battery switch is in the “on” position.
Always use appropriately sized wiring and fuses to protect both the battery switch and the inverter. Incorrect wiring can lead to overheating, blown fuses, or even a fire.
So, you’re an audiophile who loves to travel? Awesome! Make sure you check out this guide on setting up your audiophile travel setup before you go. It’ll help you enjoy your favorite tunes on the go. And don’t forget about travel insurance! Getting Aon travel insurance is a smart move; peace of mind is priceless, especially when you’re carrying expensive gear.
Plan ahead and enjoy the perfect blend of music and adventure!
Solar Panel System Integration
Integrating a solar panel system involves connecting the solar charge controller’s output to your house batteries. The battery switch sits between the batteries and the rest of your 12V system. This means the solar controller charges the batteries, and the battery switch controls whether that power is available to the rest of your trailer. A properly wired system allows the solar panels to charge the batteries even when the battery switch is off (in the “off” or “battery” position), preserving your battery’s charge.
However, appliances and other 12V loads will only receive power when the battery switch is activated to the “on” or “both” position. This prevents accidental draining of your batteries while the solar panels are charging them.
Wiring a Battery Switch to an Inverter and Solar Panel System
Imagine a typical setup: Your solar panels charge your batteries through a solar charge controller. The batteries are connected to a battery switch. The output of the battery switch feeds both your 12V system (lights, water pump, etc.) and your inverter. The inverter converts 12V DC power from the batteries to 120V AC power for your household appliances.
The battery switch acts as a master switch for the entire system, allowing you to disconnect your house batteries from the rest of the trailer’s electrical system for safety and storage.
Integrating a Battery Switch into a Travel Trailer Electrical System
Installing a battery switch in a new or existing system requires careful planning and execution. For a new system, the switch should be incorporated into the initial wiring diagram. For an existing system, it’s generally a matter of adding the switch into the existing positive (+) battery cable, before it branches out to the various loads and the inverter.
Always disconnect the battery’s negative (-) terminal before working on any wiring. Use appropriate sized wire and connectors, ensuring all connections are secure and properly insulated. Incorrect wiring can lead to shorts, overheating, and potential fire hazards. Remember to always consult the wiring diagrams and instructions provided with your specific battery switch and other components. A professional installation is always recommended, especially if you are not comfortable working with electrical systems.
Visual Representation of Battery Switch Components
Understanding the physical components of a battery switch is crucial for proper installation, maintenance, and troubleshooting. This section provides a visual breakdown of a typical battery switch, focusing on both its external features and internal workings. We’ll explore both rotary and push-button styles.A typical battery switch, regardless of its type, consists of several key components. Externally, you’ll see a robust casing designed to protect the internal mechanisms from the elements and impacts.
This casing usually has clearly marked terminals for connecting the batteries and the trailer’s electrical system. These terminals are often color-coded (e.g., red for positive, black for negative) for easy identification and safe connection. The switch itself – whether rotary or push-button – will be prominently featured on the casing, providing the means to control the power flow.
Rotary Battery Switch Internal and External Components
The rotary switch uses a rotating dial to select different battery configurations. Internally, this dial is connected to a series of contacts. When you rotate the dial, these contacts make and break connections between the batteries and the load (your trailer’s appliances). The contacts are usually made of a durable, conductive material capable of handling significant current.
A robust mechanism ensures smooth and reliable switching.
A rotary battery switch typically shows positions for “Off,” “Battery 1,” “Battery 2,” and sometimes “Both” or “Combine.” Each position connects the designated battery or batteries to the trailer’s electrical system. The internal mechanism involves a rotating cam or similar component that moves the contacts to establish the desired connection. The casing protects these delicate internal parts from damage. The terminals on the outside are securely fastened to the internal circuitry to ensure a strong, reliable connection.
Push-Button Battery Switch Internal and External Components
Push-button switches offer a simpler, more compact design. Externally, you’ll see multiple buttons, usually one for each battery and a combined position. Internally, each button activates a separate set of contacts. Unlike the rotary switch’s single rotating mechanism, a push-button switch uses independent switching mechanisms for each button. This means each button directly controls the connection of its associated battery.
A typical push-button switch might have buttons labeled “Battery 1,” “Battery 2,” and “Off.” Pressing a button closes the circuit for that specific battery, allowing power to flow to the trailer’s electrical system. The “Off” button breaks all connections. The internal mechanism for each button is often a spring-loaded contact that makes a solid connection when pressed. The internal structure is designed to minimize arcing and ensure reliable switching. The casing safeguards the internal components and ensures safety.
Mastering your travel trailer’s battery switch is more than just flipping a switch; it’s about understanding your RV’s power system and ensuring reliable electricity on the road. By understanding the different types of switches, troubleshooting common problems, and prioritizing safety, you’ll extend the life of your battery system and enjoy worry-free power, whether you’re plugged into shore power or completely off-grid.
So, grab your multimeter and let’s keep the lights on!
Helpful Answers
How often should I clean my battery switch terminals?
Inspect and clean your battery switch terminals at least once a year, or more frequently if you notice corrosion or poor connections. A wire brush and baking soda paste work well.
What size fuse should I use for my battery switch?
The appropriate fuse size depends on the amperage rating of your battery and wiring. Consult your RV’s wiring diagram or a qualified electrician for the correct size.
My battery switch is stuck. What should I do?
Try lubricating the switch mechanism with a penetrating lubricant. If it remains stuck, it might require replacement. Avoid forcing it.
Can I use a battery switch from a different RV?
While possible, it’s crucial to ensure the amperage rating of the replacement switch matches your battery and wiring system. Improper amperage can lead to overheating and fire hazards.
